Sea Frogs VPS-100 Pre-Dive vacuum leak check system.
SKU: VPS100- Regular Price
- $107.00 USD
- Sale Price
- $107.00 USD
- Regular Price
- Unit Price
- Translation missing: en.general.accessibility.unit_price_separator

|
This product is also available at the European website www.saltedlineeurope.com |
Please read our Warranty Policy.
WARNING - THIS ACCESSORY IS NOT MEANT TO BE USED UNDERWATER AS PER MANUFACTURER INSTRUCTIONS! ANY ATTEMPT TO DO SO CAN CAUSE EQUIPMENT LOSS AND IS NOT COVERED BY THE WARRANTY!
Compatible models of underwater camera housings:
- Sony A6xxx series Salted Line 60M/195FT Underwater camera housing
- Sony RX1xx series Salted Line 60M/195FT Underwater camera housing
- Sony A7S III series Salted Line 60M/195FT Underwater camera housing
- Sony A7 IV series Salted Line 60M/195FT Underwater camera housing
- Sony A6600 40M/130FT Underwater camera housing
- Sony A6700 40M/130FT Underwater camera housing
- Sony A1 40M/130FT Underwater camera housing
- Sony A7C 40M/130FT Underwater camera housing
- Sony A7C II/A7CR 40M/130FT Underwater camera housing
- Sony A7 II NG Series 40M/130FT Underwater camera housing
- Sony A7 III 40M/130FT Underwater camera housing
- Sony A7R III 40M/130FT Underwater camera housing
- Sony A7S III 40M/130FT Waterproof camera housing
- Sony A7 IV 40M/130FT Waterproof camera housing
- Sony A7R IV 40M/130FT Waterproof camera housing
- Sony A7R V 40M/130FT Waterproof camera housing
- Sony A9 40M/130FT Underwater camera housing
- Sony A9 II 40M/130FT Underwater camera housing
- Sony FX3 40M/130FT Underwater camera housing
- Sony FX30 40M/130FT Underwater camera housing
- Sony ZV-E10 40M/130FT Underwater camera housing
- Sony ZV-E1 40M/130FT Underwater camera housing
- Sony A7 IV NG 40M/130FT Underwater camera housing
- Panasonic Lumix GH5 & GH5 S 40m/130ft Underwater Camera Housing
- Olympus E-M5 III 40M/130FT Underwater camera housing
- Olympus TG-3 & TG-4 60m/195ft SeaFrogs Underwater Camera Housing
- Olympus TG-5 & TG-6 60m/195ft SeaFrogs Underwater Camera Housing
- Fujifilm X-H2 40M/130FT Underwater camera housing
- Fujifilm X-S20 40M/130FT Underwater camera housing
- Fujifilm X-T5 40M/130FT Underwater camera housing
- Fujifilm X-T4 40M/130FT Underwater camera housing
- Fujifilm X-T2 40M/130FT Underwater camera housing
(units that are sold from 1st of May 2019) - Fujifilm X-T3 40M/130FT Underwater camera housing
- Fujifilm X-T30 40m/130ft SeaFrogs Underwater Camera Housing
- Canon G1X III 40m/130ft SeaFrogs Underwater Camera Housing
- Canon EOS M50 40m/130ft SeaFrogs Underwater Camera Housing
- Canon EOS M6 Mark II Waterproof camera housing
- Canon EOS R Waterproof camera housing
- Canon EOS RP Waterproof camera housing
- Canon EOS R5 Waterproof camera housing
- Canon EOS R6 Waterproof camera housing
- Canon EOS R6 II Waterproof camera housing
Included
- Electronic valve
- Pump
- Screwdriver (for battery replacement)
The vacuum pump system checks the water tightness of the underwater camera housing before submerging it.


Install the camera inside the underwater camera housing in a dry and low humidity level place.
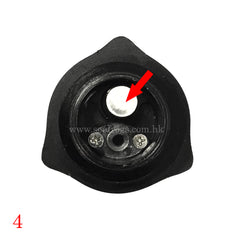
15-30 minutes before your dive, remove the lid from the backplate to access the vacuum pump system opening (Illustration 1) and ensure the O-ring stays in place. Attach a vacuum pump system to the opening by screwing it clockwise (Illustration 2). Unscrew the lid of the electronic valve (Illustration 3) and press the button to turn on the LED inside the valve (Illustration 4). Attach the rubber part of a pump to the valve and start pumping air out (Illustration 5). The red LED starts blinking, indicating ambient atmospheric pressure. The hand pump is fitted to the threaded valve body, and the air is pumped out of a unit until the red LED changes to green LED and a couple more strokes to ensure sufficient underpressure. The additional stroke or two ensures that the valve is not on the edge of the threshold. The pump is removed, and the protective cap is replaced to ensure airtightness. Observe the green LED blinking for 15 minutes to ensure no air leakage. Unscrew the lid of a valve to access the button, press it for a few seconds to release the pressure from inside, and turn the valve LED off (Illustration 4). Remove the valve from the backplate and place the vacuum opening lid in its original place, making sure the O-ring is still there (Illustration 1). It's safe to dive!


